Saturday, May 29, 2010

Use What You Got

After a trip to the zoo, my oldest daughter decided she wanted to make animals out of the petals from the 'foam flowers' my girls used to pre-decorate our Christmas tree in this post.

So, I went to gather some simple supplies: sequins, pipe cleaners and googly eyes. The rest was supplied by imagination.

The girls started with two horses and a ladybug:


Then B went on to other free form objects. A 'playground' and a 'roller coaster':


Followed by a hot air balloon and a 'sum-barine' (known to most as a submarine):


Finally, my spider and butterfly:


By the way, do NOT leave B in the room with a new tube of foam glue. Very sticky ending to an otherwise fun craft!

Bonjour Butterflies...

You'll never guess who went to a 'Fancy Nancy' party this weekend.

They were all decked out with sunglasses, tulle skirts, pink boas and gloves, and the birthday girls' mom even laid down a red carpet for them to strut their stuff.

I think even Fancy Nancy would agree that they looked tres chic, non?

Thursday, May 13, 2010

Today's Inspiration III: Got Buttons?

Back at Christmas in 2008, I made a batch of apple butter in honor of my mother-in-law. She had introduced me to it the summer prior, and when the holidays rolled around, I figured that would make a thoughtful, homemade gift for her to enjoy past the holidays. Then, for Christmas 2009, she filled the same jelly jar with a giant bunch of funky buttons for me to ooh and ahh over.


Surprisingly, it only took me 5 months to make something with them! Thanks to Amy Cluck's tutorial on Style Crush, I put together a cute creation that I sent to my mother-in-law for Mother's Day.

Very simply, pick out any buttons that stack up (snipping off the 'shank' on the back of the button if necessary) and glue them in size order on a ring form. You can pick up a ring form at any crafting store that sells jewelry making supplies. Then let your masterpiece dry. Told you it was simple!

Just to make the presentation a little fancier before sending it in the clear-topped tin you see above, I punched out a 2 inch flower from bright pink cardstock. Then I slit an opening in the middle of the flower with an exacto knife to "plant" the button ring in the center.

Thursday, May 6, 2010

Brunch Idea: This Frittata is Delish

Mother's Day is almost upon us. Traditionally, brunch is in order. If you are planning a brunch and are in need of a tasty main dish, this is a recipe I tweaked from Gourmet.

Their version requires a few vegetables to be steamed, then shocked in ice water. Breaking news: blanching is NOT a flavor booster! Plus, why would I want to create more dishes to wash by using a steaming pan and a bowl of ice water? I say, you're already using a saute pan for the peppers and onions anyway, just saute the other vegetables and pump up the flavor at the same time.

Speaking of flavor, my version has the addition of parmesan cheese, because in my opinion, you just gotta have cheese! Lastly, I share with you a tip that I learned from Emeril Lagasse (over the many years I served as his couch potato apprentice). In any dish that has multiple layers, you need to season each layer as you go. It makes SUCH a difference in the final outcome.


Spring Vegetable Frittata

1 pound thin asparagus
2 sweet bell peppers (red, yellow or orange)
3 shallots, minced
1 medium zucchini, semi-peeled and diced
3 scallions
12 large eggs
1 tablespoon unsalted butter, plus more for the baking dish
1/2 cup heavy cream
¾ cup parmesan cheese, divided
3 tablespoons fresh parsley, chopped
Salt and pepper, to taste

1. WAIT to preheat oven (to 350°F) until all your vegetables have been washed and prepped.

2. Trim asparagus from the stalky ‘breaking point’, then slice what remains into 1 inch pieces. Dice the bell peppers and mince shallots. Peel the zucchini, partially, leaving thin strips of green for color, and cut into small dice. Trim the scallions and slice thinly. Wash, pat dry and chop the parsley (not too finely).

3. Melt a half tablespoon of butter in a nonstick sauté pan. Add the diced bell pepper and season with salt and pepper. Sauté until lightly browned, 5 or 6 minutes. Remove to a bowl.

4. Add the other half tablespoon of butter to same pan. Sauté the asparagus and scallions for two minutes, then add the minced shallots and diced zucchini. Season all with salt and pepper, then sauté for another two to three minutes.

5. Now preheat your oven, and butter a 13 x 9 x 2-inch glass baking dish (3-quart).

6. In a large bowl whisk together eggs, cream, parsley, and ½ cup of the parmesan cheese. Pour this custard into the baking dish. Evenly distribute the vegetables over the egg mixture. Sprinkle with another few grinds of pepper, if desired.


7. Bake in the middle of the oven for 20 minutes. Sprinkle on the final ¼ cup of parmesan cheese, then bake for another 15 minutes until golden and set.


8. Cool frittata on a rack briefly before slicing. Serves 12.

Time Saver: You can make this frittata a day ahead, then refrigerate it after it has cooled completely. Rewarm in a 200°F oven for 15-20 minutes before serving.

Now put your feet up, pour yourself a mimosa, and enjoy your brunch with the ones you love.

Monday, May 3, 2010

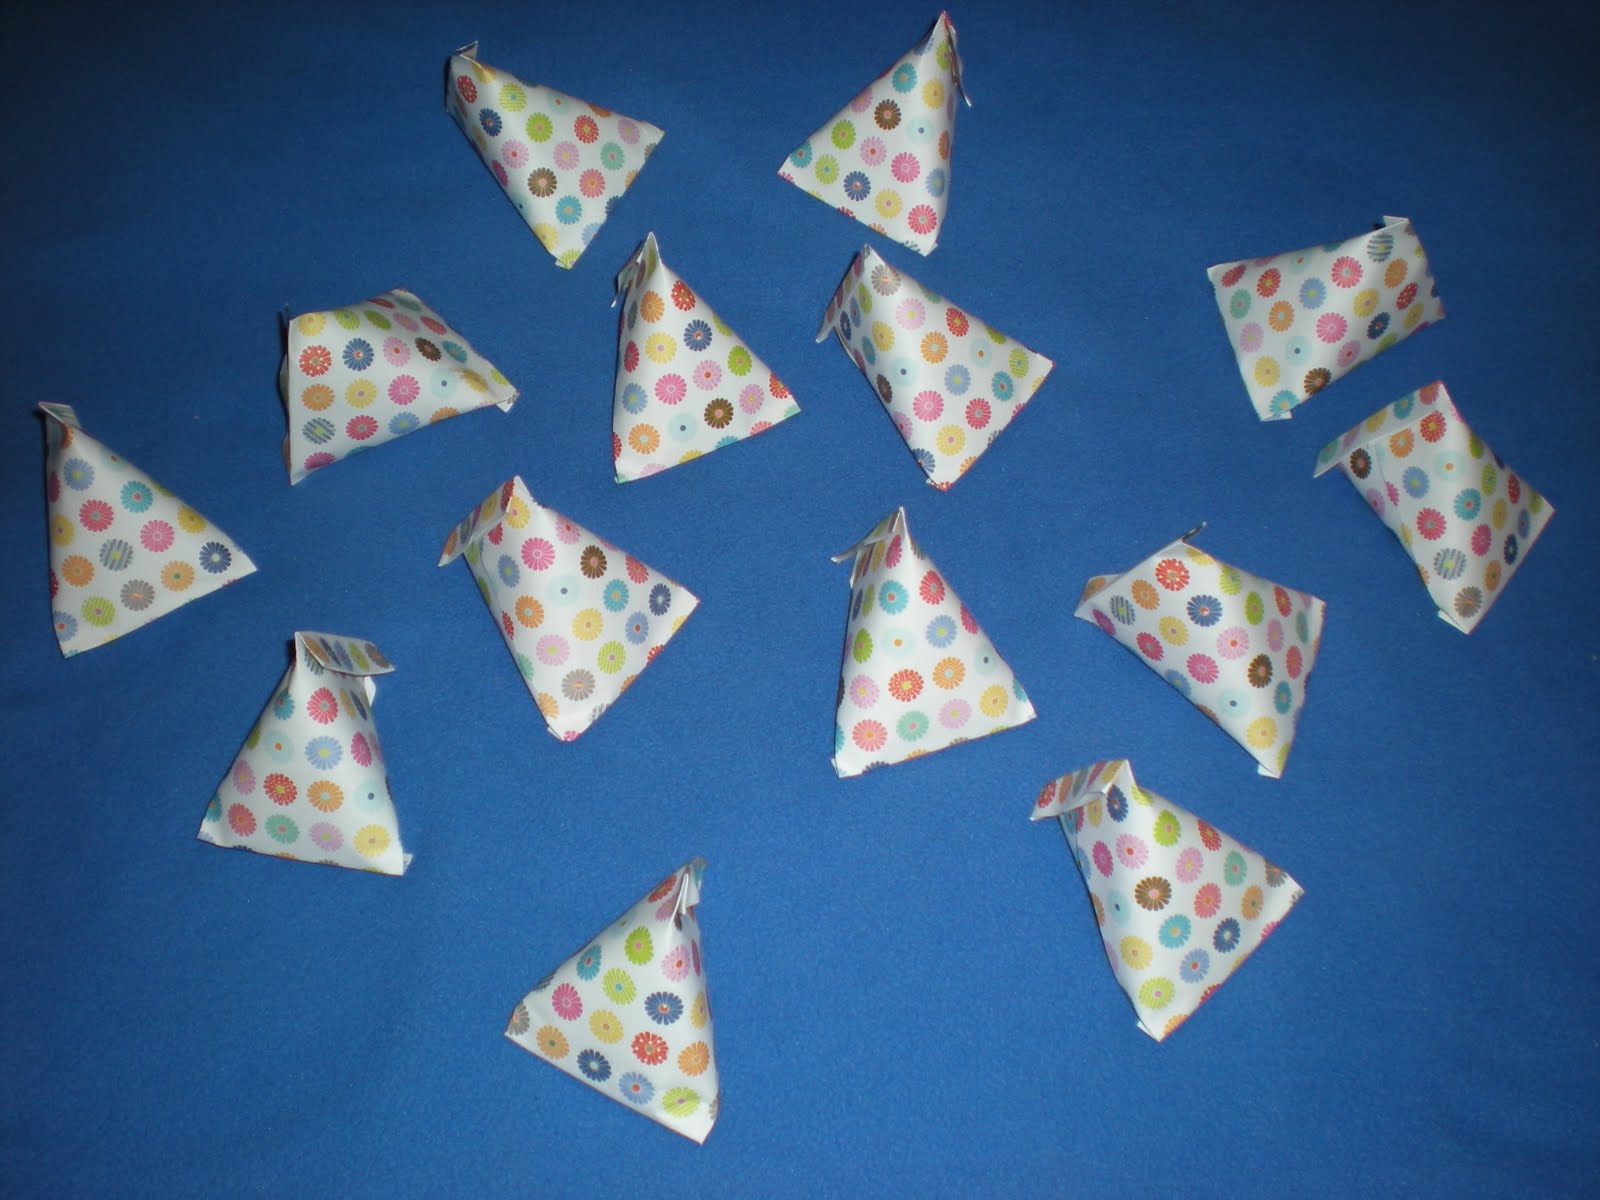
Super Simple Paper Pyramids

These paper pyramids are so simple. I promise! They make great table favors at any party, or because they are so inexpensive to make, you can fill a bunch and give them as gifts during Teacher Appreciation Week!
First, find a brightly decorative paper that you like. Cut into rectangles that are 4"x6". One 12"x12" square scrapbook page will make 6 pyramids.


Use double-sided tape one one of the short ends, then roll the paper up like a toilet paper tube.


LOTS of tubes to fill!!

Pinch one end and fold over to close.

Fill your pyramid with tasty treats. (This size pyramid holds 6 Hershey's Kisses.)

Next, pinch the other end, but in the reverse direction (ie, if your first side is folded over in a north-south sense, the other end will be folded in an east-west sense).

Optional embellishment: Punch a hole in one end's fold. Cut a piece of ribbon 6-7" in a coordinated color.
Pull both ends throught the hole, then pull the two loose ends throught the loop you created to keep it in place. Voila!

Monday, April 19, 2010

Go Greek Tonight

I am not Greek myself, but I love Mediterranean style food: briny olives and capers, salty feta cheese, vinegary dressings. One dish that has become regular in my rotation in the past few months is this Greek style meat pie made with zucchini and feta.


This recipe is adapted from a Kraft recipe which I came across in a "Quick and Simple" magazine. You can view the original recipe at the Kraft Food website. In my version, I use a bit more meat and breadcrumbs, and I keep the zucchini peels on when I grate them. (FYI: This guards the vegetable fiber and antioxidants, plus it adds color to the final product, so that the pie is not entirely brown.)

The most important redo I do that saves a ton of time is to replace the filo dough in the Kraft recipe with store-bought pie dough. You won't have to spend any time spreading multiple layers of melted butter on expensive filo dough.

My recipe:
2 medium zucchini, washed but unpeeled
1 tsp each salt and pepper
3/4 lb. ground beef (I buy a full pound, but make 2 small burgers for my kids and use the rest in this recipe)
4 oz. container crumbled feta cheese
2 large eggs
2 Tbsp. milk
1/4 cup dry bread crumbs
1 sheet of a 9" pie crust
1/2 Tbsp butter, for greasing pie dish
1 Tbsp half-and-half, or milk, for the crust

First, grate the 2 average-sized zucchini over a bowl lined with a double layer of paper towels. After 10 minutes or so, fold up the corners of the paper towels and squeeze the excess water from the zucchini shreds. (You could do this step with a dish towel, but I use dryer sheets for my laundry, and I prefer not to have the zucchini come away with the taste of Bounce.)


Then, preheat your oven to 350 degrees, and get the ground beef in a pan to brown it off. Season with the salt and pepper as it cooks, then drain.


In a large bowl, blend the seasoned ground beef, feta, eggs, milk and bread crumbs. Butter your 9" pie dish. Lay out the store bought pie crust inside it.

Pour the combined filling into the pie shell, using the back of a spatula to make it even all the way around. You can get as fancy as you want with the edge of the crust. I just folded the minor excess over to bulk up the edge. Plain and simple, no fluting or crimping for every day fare. Then use the tablespoon of half-and-half (or milk) to baste the entire edge. This will keep the crust from drying out.

Bake for 35-45 minutes. Remember, the beef has already been cooked. You only need to bake it off in the oven to cook the egg binder and bake the pie dough. If you feel like the edges are getting too brown, but the interior needs more time, you can place foil around the edges for the final 10 minutes.

Cool a few moments, then slice into wedges and enjoy! My husband enjoys topping his with mango chutney. I like to pair it up with a quick prep salad of tomatoes, olives, cucumbers and feta, tossed with a bit of Geek or Italian dressing. Warm, savory meat pie and a cool, crisp salad. Super tasty!


Monday, April 12, 2010

Today's Inspiration II: Paper Coasters

In keeping with April's green goals to avoid buying new craft supplies, I decided I needed to de-shelve an idea 'from the vault' and turn a green inspiration into reality.

Thankfully in the last week I had come across Jessica Jones' recycled magazine coasters (here) that only require 6 pages from a magazine. And I do have magazines around (believe it or not!), just right for the job.


Trust me, you want to use her tutorial for the instructions. It's not quite origami, but you do have to make multi-step folds. The six starter pages are halved, making 12 rectangles. Those twelve rectangles are folded in half, then into thirds, and they will eventually look like these 12 Vs.


The Vs are woven together, like a double-sided pie crust. Six down and six to go...


Unlike Jessica's instructions, I did not cut any of my loose ends. For instance, the tab that's bent up in the photo below, I refolded back under the square with the red checks. For some of the ends that were edges, I tucked back into the center itself.


I tried to expose the most colorful sides of the paper on the topside of the coaster. The underside, seen above, is practically all typeset. If I were to make more of these coasters in the future, I would definitely make a few dozen strips first, then match them up by color family before weaving.

So, critique of the final product. It was a moderately fun activity. Not as much fun as, say, browsing the internet for cool craft projects, but I considered it an exercise for the hands, and for the mind as well. My daughter's opinion? "You did a really good job, mom." Then she asked if she could put her drink on it. Passes the test.

Monday, April 5, 2010

April Awareness: Think Globally, Act Locally

Well, I can't get any more local than my own closet, and the mighty craft stash within.


With Earth Day looming, I have seen more and more ideas about 'stash busting', or basically, 'use what you've got', instead of continuing to ACCUMULATE. With the convincing argument of Heather at Dollar Store Crafts, I pledge to participate in the April Stash Bust. I am *forbidden* to buy more craft supplies 'just because'. And to encourage others to resist the temptation of buying more STUFF and put what they are no longer using to good use, you can also participate in a swap of what you are no longer using, or simply have too much of, as it is in my case.

If you would like to read all of Heather's great ideas of why YOU should take the leap and bust YOUR stash, you can find it here:  http://croqzine.com/?p=364

But, but...I have a coupon for Michael's...(sniff, sniff). Stay tuned for the swap results.