Recently our family took a picnic lunch to a park that has a 1 mile walking trail around a lake. After playing at the playground for an hour, followed by feeding the ducks lakeside, my oldest did not want to embark on a 1 mile hike. My youngest followed suit, feigning that she, too, was uninterested.
Well, I didn't want to walk the trail alone, and I wanted to see my kids getting some exercise. Somehow, I turned up the charm only the way a mommy can, and I offered a "magic" bag to contain a nature collection for our walk. (Yup, that's an empty tortilla bag. Didn't you know that ducks like tortillas?)
So, off we went, just my youngest and I, trying to find leaves from as many different trees and plants as we could find. Turns out there were a lot of varieties.
My reason for this post, (aside from the obvious one of me schooling you on our local ducks' diet)?
Well, I hope that what my daughter did following our Nature Hunt is a good indication of a happy childhood.
Now get out there and find some HAPPY leaves and sticks of your own!
Wednesday, September 15, 2010
Monday, September 13, 2010
What are you going to do with all those shells?
Design custom mermaids of course! Add a few gems, pearls, pipe cleaners (?) and paint strokes and you'll have a few fine maids of the sea.
M wanted to draw her own mermaid. Then she was so pleased with her first design, she replicated a second one to bring in for her art teacher. Check out the mini corkscrew shell earrings!
B let me design and cut out her first one (the largest version at top), then she took a stab at her own, more diminutive mermaid.
When the creating is complete, your little mermaids or mermen may enjoy a reading of Mermaids on Parade by Melanie Hope Greenberg. It's a story about a young girl in Brooklyn who joins the annual Coney Island parade to mark the beginning of summer. I'm still holding on to the last rays of summer sun before fall takes a stronghold.
M wanted to draw her own mermaid. Then she was so pleased with her first design, she replicated a second one to bring in for her art teacher. Check out the mini corkscrew shell earrings!
B let me design and cut out her first one (the largest version at top), then she took a stab at her own, more diminutive mermaid.
When the creating is complete, your little mermaids or mermen may enjoy a reading of Mermaids on Parade by Melanie Hope Greenberg. It's a story about a young girl in Brooklyn who joins the annual Coney Island parade to mark the beginning of summer. I'm still holding on to the last rays of summer sun before fall takes a stronghold.
Tuesday, August 31, 2010
Summer Cool Down, Target style
Oh Target, My Target. How I love you so. Especially during summer clearance time. I mean it. Seriously. How can you top a Slip and Slide for $2.49?!? Obviously my girls don't think you can.
(We learned pretty quickly that we had to move said Slip and Slide from a level area to an area with a downward slope. Phew! That saved a lot of energy previously spent dragging them down to the end. My arm muscles were still sore the next day.)
Then to add applause to admiration (my own saying that's the reverse of 'adding insult to injury'), I also scored a Sunbeam 1 qt. canister ice cream maker for $12.50!
The girls were ready to bring it home and start making ice cream right away. Of course I had to explain to them that the canister had to set up in the freezer for 24 hours.
That gave me time to gather all the ingredients for this recipe:
Chocolate Chip Mint Ice Cream
(yes, I know it's 'backwards', but that's what my daughters call it)
2 cups heavy cream
1 cup sugar
1/2 teaspoon salt
1 teaspoon vanilla extract
1 teaspoon peppermint extract
3 drops green food coloring (optional)
1 cup miniature semisweet chocolate chips
1. In a large bowl, stir together the milk, cream, sugar, salt, vanilla extract and peppermint extract until the sugar has dissolved. Color to your liking with the green food coloring.
2. Pour the mixture into an ice cream maker, and freeze according to the manufacturer's instructions. After about 10 minutes into the freezing, add the chocolate chips. After the ice cream has thickened, about 30 minutes later, spoon into a container, and freeze for 2 hours.
It really helps to prechill the ice cream mixture (actually pre-freeze for 20or 30 minutes) before pouring into the canister. Room temperature ingredients are tough to solidify!
And did I mention that the Target ice cream cones were .92 cents?!
~Bliss!~
Sunday, August 22, 2010
Homemade Htipiti
What is Htipiti? It is an outrageously yummy dip made with 4 ingredients...and a processor. If you're like me and enjoy Greek food (evidenced in a previous post) you must try this!
My recipe is inspired from a local restaurant my family frequents called Athens Kouzzina. I am never disappointed by any dish that I have tried there, from traditional salads and gyros, to pastas and seafood. My kids like it because they are allowed to draw on the paper tablecloths.
You will need
My recipe is inspired from a local restaurant my family frequents called Athens Kouzzina. I am never disappointed by any dish that I have tried there, from traditional salads and gyros, to pastas and seafood. My kids like it because they are allowed to draw on the paper tablecloths.
You will need
- a 12 oz jar of roasted red peppers
- 4 oz feta cheese
- a splash of olive oil
- a pinch of pepper flakes (optional but strongly encouraged for a good KICK)
First step, drain the roasted red peppers in a colander and then blot over a couple of paper towels. This keeps the final product from becoming runny. You also want to wipe off as much of charred skin as possible. (Caution: this will turn your fingernails red/orange for a day.)
Then you need to drain the liquid from the feta and slice it up.
Next, dump the peppers and feta into a processor. Toss in a pinch of pepper flakes, as much as you can handle, and about a tablespoon of olive oil. The olive oil is just to keep the mixture moving, not as a substanial element. The traditional method of making this dip calls for a pepperoncini pepper instead of the pepper flakes, so if you have any on hand, try one of those instead.
Pulse the processor until your chunks of are broken down, but you want a textured final product, not a smooth paste.
We are wild about this dip on warm pita trianlges, but today I was bringing the dip to serve at a potluck reception, so to avoid each person at the buffet table having to spread the dip individually, I decided to spread the dip inside of tortillas and cut them into self serve portions.
Slicing tip: Make sure to wipe the blade of your knife after each complete cut. That way you won't be spreading the schmear of the dip onto the top of the next slice. Hope you like it!
Thursday, July 29, 2010
Swap Success
The "I'm a New Blogger, Follow Me" Swap was a tremendous success. I found some pretty original bloggers out there. Many from the good ol' USofA, and two ladies from Tanzania and Singapore, too.
@ Sharissa (sharylove) http://www.blog.sharylove.com/
Advice for pregnant women and new moms by Shary, a certified doula, and her own adventures as a mother of 1.
@ Rochelle (stampkrl) http://threeturnstohome.blogspot.com/
Sewing and quilting projects galore, an embroidery machine afficianado.
@ Joni (QUEENQUISA) http://wwwtrainmama.blogspot.com/
The swap organizer and definitely a queen in the coupon swapping kingdom.
@ Ambrosia (LadyAmbrosia) http://www.birth-ofa-notion.com/http://www.birth-ofa-notion.com/
Ambrosia loves all things mail: post cards, vintage stamps, wax seals, and tricked out homemade envelopes. Oh yeah, and Bon Jovi.
@ Jessica (icalea) http://jeffjessandmaxbrown.blogspot.com/
This mama makes all kinds of fab creations: felt flash cards, bed roll, camera straps, ouchie cold packs. Tutorials would be great (!) but hopefully her etsy shop (BambinoBazaar) will be filled with her wonderful wares soon so we can all enjoy them.
@ Jessica (sparsileactivity) http://sparsilevacivity.blogspot.com/
A fellow Georgian providing toy/game reviews and make-up reviews.
@ Tima (teemis) http://nisbetfam.blogspot.com/
Pictures, recipes, and observations of a Canadian mom living in Tanzania with her husband and 4-year-old son.
@ Pauline (scrappinauntie) http://scrappinauntie.blogspot.com/
A California geocaching grandmother, strawberry-loving, scrapbooking MACHINE! She has made over 200 pages so far this year alone.
@ Samantha (mireillie) http://neomuyeppeo.org/
Reviews of iPhone apps games and discussions/video posts of current music trends in Asia.
@ Crystal (3stairs) http://3stairs.com/
A graphic designer and homeschooler living in Texas. My 10th swap partner – glad I saved the best for last. She made a pictorial review of her 10 partners. Nicely done.
I do enjoy browsing other blogs, but it's been especially nice to find somebody reading mine for a change. Thanks you to all the lovely ladies who stopped by to find out what "Fun As You Make It" is all about. I truly appreciate your thoughtful comments.
@ Sharissa (sharylove) http://www.blog.sharylove.com/
Advice for pregnant women and new moms by Shary, a certified doula, and her own adventures as a mother of 1.
@ Rochelle (stampkrl) http://threeturnstohome.blogspot.com/
Sewing and quilting projects galore, an embroidery machine afficianado.
@ Joni (QUEENQUISA) http://wwwtrainmama.blogspot.com/
The swap organizer and definitely a queen in the coupon swapping kingdom.
@ Ambrosia (LadyAmbrosia) http://www.birth-ofa-notion.com/http://www.birth-ofa-notion.com/
Ambrosia loves all things mail: post cards, vintage stamps, wax seals, and tricked out homemade envelopes. Oh yeah, and Bon Jovi.
@ Jessica (icalea) http://jeffjessandmaxbrown.blogspot.com/
This mama makes all kinds of fab creations: felt flash cards, bed roll, camera straps, ouchie cold packs. Tutorials would be great (!) but hopefully her etsy shop (BambinoBazaar) will be filled with her wonderful wares soon so we can all enjoy them.
@ Jessica (sparsileactivity) http://sparsilevacivity.blogspot.com/
A fellow Georgian providing toy/game reviews and make-up reviews.
@ Tima (teemis) http://nisbetfam.blogspot.com/
Pictures, recipes, and observations of a Canadian mom living in Tanzania with her husband and 4-year-old son.
@ Pauline (scrappinauntie) http://scrappinauntie.blogspot.com/
A California geocaching grandmother, strawberry-loving, scrapbooking MACHINE! She has made over 200 pages so far this year alone.
@ Samantha (mireillie) http://neomuyeppeo.org/
Reviews of iPhone apps games and discussions/video posts of current music trends in Asia.
@ Crystal (3stairs) http://3stairs.com/
A graphic designer and homeschooler living in Texas. My 10th swap partner – glad I saved the best for last. She made a pictorial review of her 10 partners. Nicely done.
I do enjoy browsing other blogs, but it's been especially nice to find somebody reading mine for a change. Thanks you to all the lovely ladies who stopped by to find out what "Fun As You Make It" is all about. I truly appreciate your thoughtful comments.
Wednesday, July 21, 2010
Calling All New Bloggers
Back in April, I joined
.
The reason I joined was because the Dollar Store Crafts blog challenged its readers to a) give up shopping for new craft supplies for the month in the 'Reduce, Reuse, Recycle' spirit of Earth Day, and b) to find someone on swap-bot to exchange surplus craft supplies with.
It has been a lot of fun seeing the types of swaps that people create. It seems that there are a lot of swaps intended to find pen pals or to exchange recipes, postcards, treats, and craft ideas. They can revolve around a theme of some sort (a specific color, a cartoon/anime character, a holiday or season) or they can be centered around what the recipient writes in his/her profile.
I have learned some new lingo involved with swapping, too, like newbies, flakes, sender's choice and angel. (**You swappers know what I'm talking about.**)
This week I found an intriguing swap. One that introduces 10 other swappers to your blog. In return, you also follow 10 swappers blogs as well. I think this is a fantastic idea because I love to hear what others think about my blog, but it appears that I have few readers. Hopefully this swap will cure my no comment blues, and maybe I'll make a couple bloggie friends along the way.
.The reason I joined was because the Dollar Store Crafts blog challenged its readers to a) give up shopping for new craft supplies for the month in the 'Reduce, Reuse, Recycle' spirit of Earth Day, and b) to find someone on swap-bot to exchange surplus craft supplies with.
It has been a lot of fun seeing the types of swaps that people create. It seems that there are a lot of swaps intended to find pen pals or to exchange recipes, postcards, treats, and craft ideas. They can revolve around a theme of some sort (a specific color, a cartoon/anime character, a holiday or season) or they can be centered around what the recipient writes in his/her profile.
I have learned some new lingo involved with swapping, too, like newbies, flakes, sender's choice and angel. (**You swappers know what I'm talking about.**)
This week I found an intriguing swap. One that introduces 10 other swappers to your blog. In return, you also follow 10 swappers blogs as well. I think this is a fantastic idea because I love to hear what others think about my blog, but it appears that I have few readers. Hopefully this swap will cure my no comment blues, and maybe I'll make a couple bloggie friends along the way.
Sunday, July 18, 2010
A Spoonful of Sugar
Yes, I know that song is from "Mary Poppins", but it seemed to aptly fit tonight's family activity: watching the 1971 version of "Willy Wonka and the Chocolate Factory".
While searching for a few pictures to add to this post, I also learned a cool tidbit about Roald Dahl's inspiration for Charlie and the Chocolate Factory. According to Wikipedia, the story's origin was based on the feuding of the top two British chocolate companies during Dahl's schooldays. Cadbury would often send test packages to schoolchildren in exchange for their opinions on new products. At that time (around the 1920s) Cadbury and Rowntree's often tried to steal trade secrets by sending spies into the other's factory, posing as employees. Because of this, both companies became highly protective of their chocolate making processes. It was a combination of this secrecy and the elaborate, often gigantic, machines in the factory that inspired Dahl to write the story.
A few months back, we read the chapter book of Charlie and the Chocolate Factory by Roald Dahl to the girls. They were on edge while Charlie and his impoverished family were on the brink of starving, they were ecstatic when Charlie found the last Golden Ticket, and they were filled with wonder of the fantasy-filled rooms in the mysterious Wonka Chocolate Factory.
I am delighted to share with you that the girls were equally captivated by the movie. I was impressed that even several months after we had read them the novel, they recalled so many details. B told us that they didn't show the room where 'the square candies look round' , and M noticed that they didn't have the room where the squirrels sorted the good nuts from the bad nuts. (FYI: Wikipedia has a long list of other rooms that are mentioned in the book, but which were not visited by Charlie and the other guests.)
On occasion, the girls do ask for popcorn when they have friends over to watch a movie. But since we're not a family that has regular movie nights, they didn't even ask for popcorn tonight. Instead, to 'sweeten' their movie experience, just when Willy Wonka opens the doors to the chocolate room, I treated the family to a scrumdidilyumptious selection of confections. (Am I beginning to sound like Willy Wonka himself?)
My two aren't about to steal any secret recipes from the big players in the world of chocolate making. But they are willing to sample their wares at every possible opportunity. Hope you enjoy a sweet moment with your family.
Monday, June 28, 2010
July 4th Paper Rosettes
I'm always looking for a diversion when I'm in the passsenger seat during a long road trip. Sometimes I browse through a stack of magazines. Last year, I made these pinwheels in the car on the way to our Fourth of July beach destination.
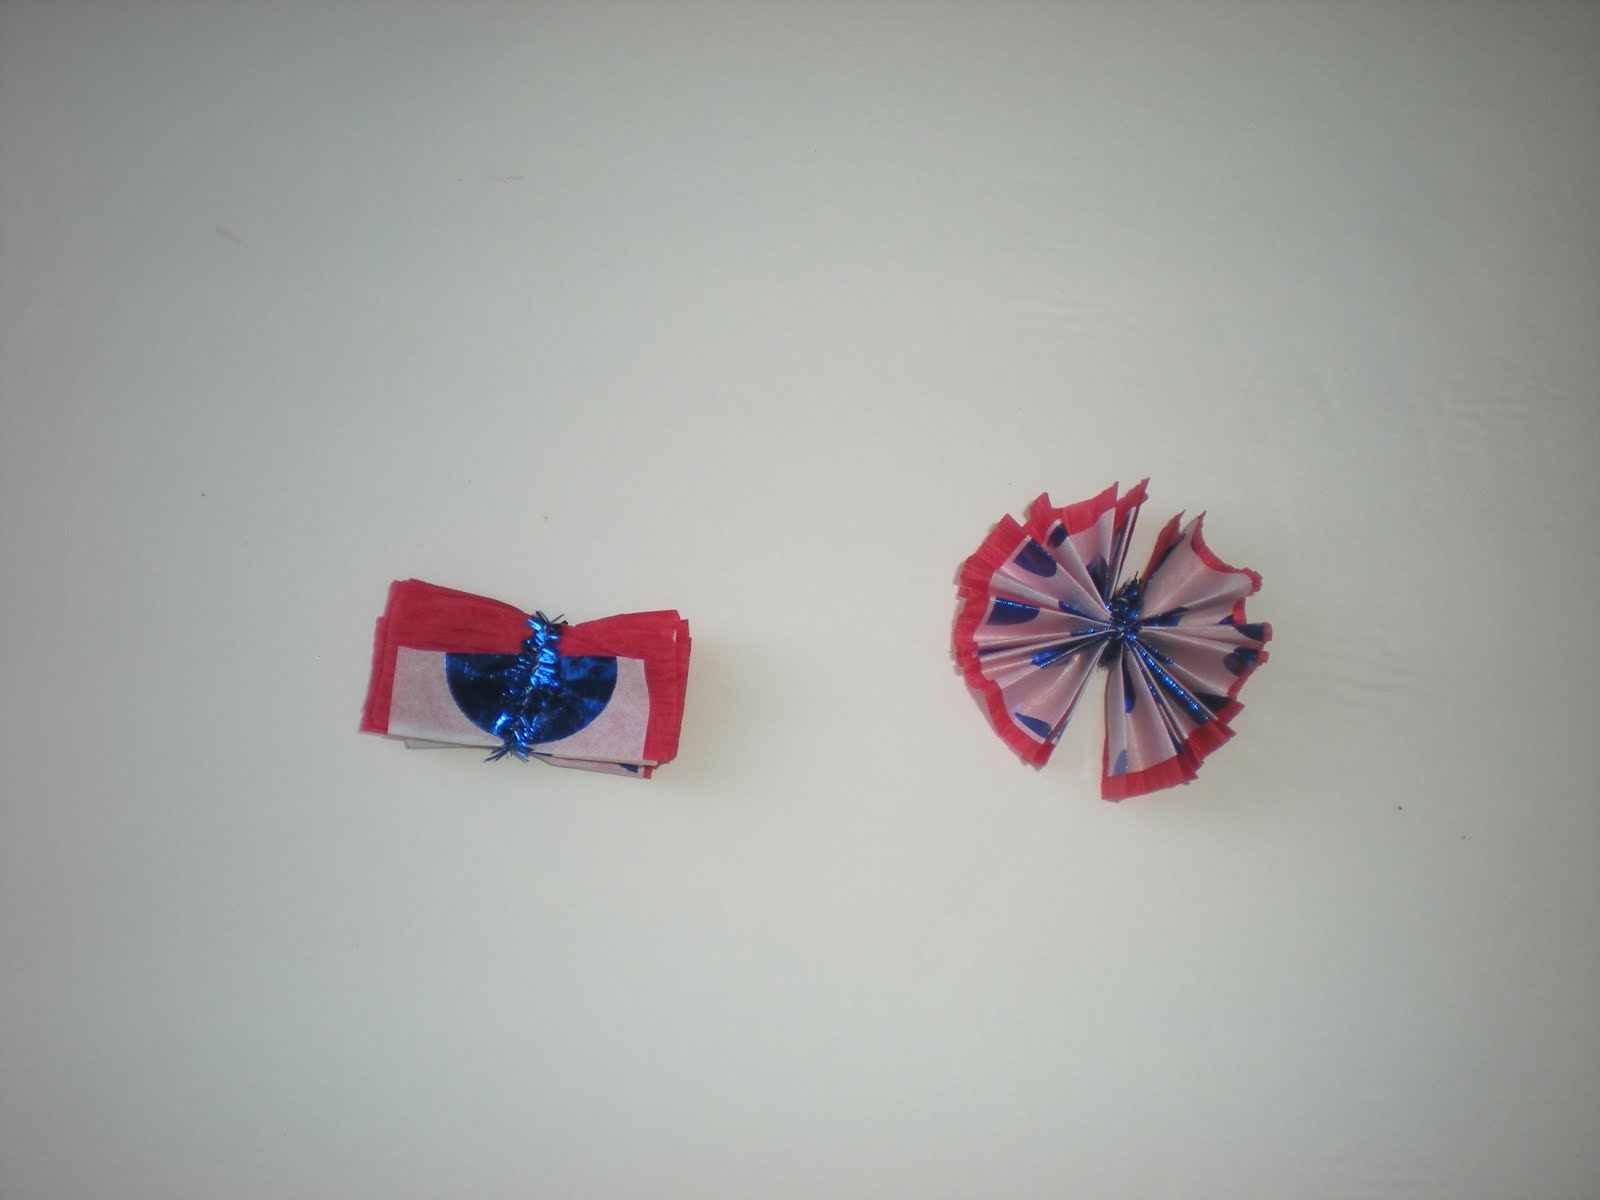
And of course for a car trip, I don't want to be juggling a dozen different craft supplies, which makes this craft a winner. Three (cheap!) materials needed: a roll of crepe paper streamer, tissue paper and pipe cleaners.
Fold the two strips together, accordian style for the length of the two strips. Pinch in the middle and twist an inch or two of the pipe cleaner around the center. Finally, fan out the folds so that the edges of the top and bottom meet on each side to form a circle.
You may want to use glue dots or a glue stick to keep the rosette open, but if you don't mind your rosettes not being a perfect circle, then you're done!
My thanks to Tricia at Oh So Crafty for the inspiration of these rosettes. She linked her rosettes together to hang as a 4th of July banner. I just made a big bunch and scattered them around the table like confetti.
Also, hers were assembled with 3 strips of material (yay, a fellow recycler!) trimmed with pinking shears, but I took a shortcut with a tissue paper that had a white background and blue foil circles.
And of course for a car trip, I don't want to be juggling a dozen different craft supplies, which makes this craft a winner. Three (cheap!) materials needed: a roll of crepe paper streamer, tissue paper and pipe cleaners.
Cut a length of the streamer that will be the background piece, about 9 inches. Then cut a strip of the tissue paper in the same length, but slightly more narrow so that the red will show on either side of the tissue.
Fold the two strips together, accordian style for the length of the two strips. Pinch in the middle and twist an inch or two of the pipe cleaner around the center. Finally, fan out the folds so that the edges of the top and bottom meet on each side to form a circle.
You may want to use glue dots or a glue stick to keep the rosette open, but if you don't mind your rosettes not being a perfect circle, then you're done!
My thanks to Tricia at Oh So Crafty for the inspiration of these rosettes. She linked her rosettes together to hang as a 4th of July banner. I just made a big bunch and scattered them around the table like confetti.
Also, hers were assembled with 3 strips of material (yay, a fellow recycler!) trimmed with pinking shears, but I took a shortcut with a tissue paper that had a white background and blue foil circles.
Subscribe to:
Posts (Atom)